Showing posts with label Appetizers. Show all posts

Monday, April 25, 2016

Melissa's Greek Spanakopita Triangles


I first heard of this dish when I saw the first "My Big Fat Greek Wedding" movie.   Spanakopita is a Greek delight, which literally translates to "spinach pie".   It is phyllo pastry brushed with butter and filled with a spinach and feta cheese mixture.   Dill is the essential ingredient for this dish, so be sure not to leave that out.   This dish is simple in flavor, but delicious!

Melissa's Greek Spanakopita Triangles
 
Ingredients:
2 tablespoons olive oil
1 cup diced green onion (or regular onion)
¼ cup fresh dill, finely chopped
1 tsp. minced garlic
8 oz. bag fresh washed spinach (or equal amount of frozen spinach)
12oz. container crumbled feta cheese
2 eggs
¼ cup sour cream (optional)
1 stick melted butter
¼ cup olive oil
1lb package of phyllo dough, fully thawed

Tool you will need:   Pastry brush
 
 Directions: 
1.        In a large pan, heat the olive oil to medium heat.  Add the onions, dill and garlic.  Sautee until the onions become clear, stirring frequently. 
2.       Add spinach to the pan (if using an equal amount of frozen spinach, make sure it is thawed and all the liquid has been squeezed out).  Allow the fresh spinach to cook down in the pan, turning it over every 30 seconds or so, until all the leaves have wilted.  This should take about 3 minutes.  Remove from heat. 
3.       In a mixing bowl, combine the feta cheese, sour cream and eggs.  Blend very well.   Add to the spinach pan, and mix until well incorporated.  This will be your filing. 
4.       In a smaller bowl mix together the melted butter and olive oil.  Set aside. 
5.       Preheat oven to 350 degrees.    Unroll the phyllo sheets.  Peel up one Phyllo sheet, fold it in half lengthwise and lay it down.  It should now look like a long strip, about 3 or 4 inches wide.  Brush with butter/olive oil mixture, until the whole surface is lightly dampened.   Do the same with a second sheet of phyllo, laying over the top of the first one.  
6.       Using a kitchen spoon, take a walnut-sized portion of the spinach filing and place filling on one of the buttery phyllo strip.   Begin folding the spinach filing into the philo strip, in a triangular fold like a flag.  Keep folding until the filling is no longer visible and the entire strip of phyllo is now a puffy triangle. 
7.       Brush a baking sheet with some of the butter/olive oil mixture and place the folded phyllo triangle on the baking sheet.   Repeat with more phyllo sheets until all your spinach filling is used up. 
8.       Bake spanakopita triangles in the oven for 20 to 25 minutes, or until golden.  Remove from oven and let stand 5 minutes.  Serve.  

Wednesday, June 18, 2014

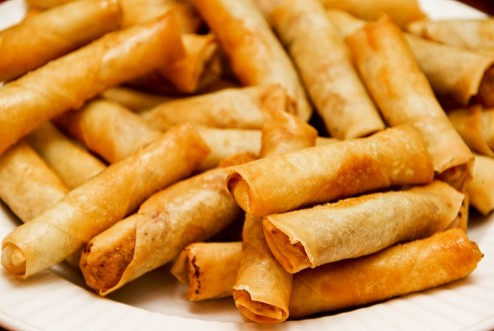
Filipino Lumpia Recipe


Hot, crispy and delicious! This is a recipe for Filipino Lumpia (Filipino Egg Rolls). My great uncle Carl married a lovely Filipino lady, so I have a few half-Filipino cousins too. His wife and her sister both came to live with our family in the United States. They usually brought these scrumptious goodies to family events (along with some rice noodle dishes, and some adobo). The lumpia never lasted long though, because they are soooo addictive! But that is how our family became so familiar with them.  

While I cannot share the family recipe (they run a business selling their Lumpia called "Ilocos Lumpia" and specifically requested that I don't share their recipe)-- I will share my own tweaked recipe here, which is still pretty good! Plus a few useful tips.

I've done my research, too. Most of the basic, traditional Lumpia recipes will contain at least ground meat, onion, garlic and carrot.  Regardless of the changes people make to the recipe, those are almost always the base ingredients they start with.   

But there are just as many variations of the recipe, as there are Filipino families! Some of them much more common than others, of course.

This is a basic recipe, with a few very common extras—but also a few ideas (which are optional) for anybody looking to jazz-up the mixture to make it different each time, for variety.  

There are 2 ways of cooking Lumpia—by pre-cooking the meat mixture before stuffing the wraps, or by leaving the meat raw and letting it cook during frying. The choice is yours. Both methods work well, and come out great!  

But for my recipe, I’m going to be using the “pre-cook the meat” method, because that’s how my aunt and cousins do it. Less risk of uncooked meat, and cooks faster. Freezes better too. This recipe can be doubled, tripled, etc., for however many people you are feeding.  

Filipino Lumpia Recipe


Meat filling:
2 lbs ground beef, chicken, turkey or pork
1/2 cup shredded carrot
1/2 cup chopped green beans
¼ cup minced red or green onion
1.5 tsp salt
2.5 tsp black pepper
6 cloves minced garlic
1 packet (1 tsp) powdered / crushed chicken or beef bullion
1/8 cup soy sauce
1.5 tablespoons sugar
1 tsp Asian Seasoning (or a mix of equal parts cinnamon, cloves, ginger and white or regular pepper)
1/2 tsp sesame oil
1 pack (16oz.) spring roll / lumpia wrappers

Other Needed Items:
2 egg yolks whisked together and set aside (for sealing the wrappers)
½ cup vegetable or canola oil for frying (or enough to fill the pan with ½ inch of oil)

OPTIONAL INGREDIENTS-- As promised, here are some other ingredients you can add for variety (as you can see in the recipe above, I have added carrots and green beans, my favorite!). It’s recommended you DO NOT add more than 2 of these extra ingredients, otherwise your mixture will be too “bulky” with not enough meat. But of course if you are a vegetarian, feel free to splurge! Its best to use ½ cup of any addition, minced:

Shrimp
Shredded cabbage
Cilantro
Water chestnuts
Mushrooms
Celery
Green beans
Bean sprouts
Potato
Bell pepper
Or 1 tsp mushroom seasoning, or orange zest

Directions:

1.      1. In a large skillet over medium heat, add the meat and vegetables. When meat begins to brown, add (one at a time) the salt, pepper, garlic, bullion, soy sauce, sugar, Asian seasoning, and sesame oil. Blend well. Cook an additional 5 minutes, stirring frequently so the spices don’t burn and the garlic flavor releases into the mixture.  
      2. Remove from heat and allow meat mixture to cool until you can easily handle it.
2.     3. Peel lumpia wraps apart slowly, don’t tear them. You can keep them between 2 damp paper towels (rung out very well) to keep them from getting dry as you work. Cut wraps in half corner to corner, creating 2 triangles. You can make more lumpia with fewer wrappers this way. 


3.       4. Take 2 tablespoons of meat mixture and spread it out horizontally, along the widest edge of the wrap. Secure the meat by folding the wrap around it like a skinny tube, tucking in the ends. Roll it up the rest of the way, and secure it closed at the end, with egg yolk. Set aside, folded side-down. Repeat until all the mixture is gone.


4.      5. Heat the oil in a large skillet, over medium heat. You want your oil to be hot enough to make the lumpia wrapper golden and crispy, but not too hot. Basically, the oil should not be smoking. If it’s too hot, turn it down. Otherwise, your lumpia will burn on the outside very quickly.  
5.      6. Place as many Lumpia into the pan as will fit comfortably, leaving about 1/2 inch of space between the lumpia. Do not crowd the pan, or they may stick together, or take longer to cook. Turn the lumpia as they begin to brown, so that all sides of the wrap will become golden. Fry for about 2 to 4 minutes, depending on your pan, until golden. Don't forget to turn them!


6.       7. Remove lumpia from oil and let drain on a clean kitchen towel, or paper towel. Serve hot with sweet chili sauce.    


TIP: You can make lumpia in bulk ahead of time. Uncooked lumpia rolls can be frozen for up to 2 months. When it comes time to cook them, simply let them sit out (spread apart) for about 30 minutes, and then cook as usual.  

Thursday, December 26, 2013

East-Indian Samosas


This is a delicious East-Indian appetizer, and one of my favorites.  You can also make them slightly larger, or make more of them and turn it into a meal in itself.  They are a fun project to make, you can even get the kids to help.  They are triangular shaped pastries, filled with a spiced potato mixture.  Some people also add minced meat to the mixture, it depends what you like.  But they are quite  mouth-watering!

Samosas
(makes 8)

Dough:
½ cup all purpose flour
1 tsp Suji, Or semolina flour (optional)
¼ tsp salt
1 tablespoon + 1 tsp oil
¼ cup lukewarm water

Filling:
2 medium boiled red potatoes (should be boiled whole until tender but not mushy, then cooled and cut into ½ inch cubes)
1/3 cup sweet peas
2 tablespoons oil
½ tsp cumin seed
1 tsp coriander powder
¼ tsp red chili powder
½ tsp Garam masala
1 tsp umjur (dried mango) powder (or a few drops of lemon juice)
2 medium green chilies, seeded and chopped
1tsp salt

Plenty of oil for deep frying

Directions:

Making the dough:

1.        In a medium mixing bowl, place the flour, suji, salt and oil.  Mix together by had for about 10 seconds. 
2.        Add the lukewarm water, and blend to make a dough.  Knead for about a minute.  Set dough aside, covered, and allow it to rest for at least 20 minutes. 

Making the filling:

1.        Heat 2 tablespons of oil on medium in a medium skillet.  Add the cumin seed to the oil, along with the green peas, coriander, garam masala, green chilies.  Blend well and fry for 1 minute.
2.        Add potatoes, mix until well blended.  Then add the salt.  Stir-fry for about 2 minutes.
3.        Add mango powder, blend well.  Taste your filling at this point to test if you want more salt or chilly powder.  If you add more, blend well.
4.        Turn off heat and set filling mixture aside to cool for about 15 minutes.  It will cool faster if you spread it out on a large plate.

Making the Samosas:

1.        On a flat surface, knead the samosa dough for a few seconds.  Divide dough into 4 equal balls and slightly flatten them. 
2.        Roll each ball out about 6” in diameter.  Cut each circle in half.
3.       Lay a half dough circle in the palm of your hand and dip the fingertips of your other hand into some water.  Rub the water along the outer edges of the half circle of dough. 
4.       Place about 2 heaping tablespoons of the potato filling on one side of the half circle of dough.  Fold the other side over to enclose the filling.  It should resemble a triangle in shape.  Now pinch all the edges of the dough together, so they will not come apart during cooking.  Repeat these steps with the rest of the dough.
5.       On medium, heat a large deep-frying pot or skillet filled about 2 inches deep with oil.  Oil should not be too hot, you can test it by dropping a tiny piece of dough in the oil.  The dough should not rise up too fast.  It should only sizzle a bit at the bottom, then slowly rise.  If it rises too fast, the oil is too hot so you should reduce heat for a few minutes.
6.       Once oil is ready, fry the samosas, 4 at a time, for about 5 minutes.  During frying you should turn them over after about 2.5 minutes.  Once they are golden in color, like wontons or egg rolls, remove them from the oil and place on paper towels to drain.  Serve hot with any Indian dipping sauce, if desired.

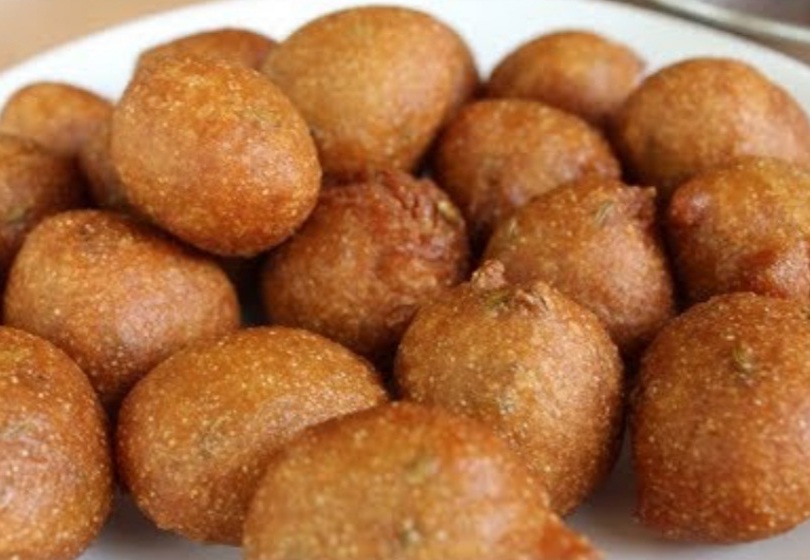
East-Indian Gulgula


I love eating these as an occasional treat.  Its fairly simply, and very tasty!


Gulgula 


(East-Indian version of fried doughnut holes)

½ cup Atta flour, or all purpose flour
½ cup sugar
2 tablespoons yogurt
1 tsp oil
¼ tsp fennel seed
3-4 tablespoons water
Oil for deep frying

Directions:
1.      Combine all ingredients in a bowl, adding water last.  Mix thoroughly.

2.      Heat oil over medium-high heat.  Oil is ready when it is hot, but not smoking, and a test drop of batter raises and sizzles immediately.

3.      Drop batter into pan 1 heaping tablespoon at a time.  Try to keep batter drops separated to avoid sticking.  Do not over-crowd the pan.  

4.      Batter drops should puff up into balls like doughnut holes.  Stir batter puffs around to brown all sides evenly.  Remove from oil when they are golden brown, and place them on a plate lined with paper towels to drain.  Serve hot or cool as a desert.