Thursday, June 19, 2014
Filipino Chicken Adobo
This is another Filipino dish I remember seeing at family gatherings, courtesy of some awesome Filipino relatives who married into our family. Not their recipe, as they don't measure, they eye-ball everything during cooking. But still a very good one from a non-related Filipino friend of mine.
The 5 most basic ingredients of Chicken Adobo (aside from the oil) are usually chicken, garlic, pepper, bay leaf, and soy sauce. This recipe adds a bit of sugar and some onions, for a sweet/savory taste, which is also common. But I have heard of people using other sweeteners such as fruit juice or even honey. And some use no sweeteners at all. It really is a very simple and basic dish though. Easy to cook and delicious!
Traditionally, it is served with steamed white rice and fresh tomato slices on the side.
Filipino Chicken Adobo
Ingredients:
1/2 cup vinegar, (optional, you can also use water or broth)
1/2 cup soy sauce
5 bay leaves
1 1/2 teaspoons black pepper (ground or whole)
1 tbsp sugar (brown or white)
2 pounds cut-up chicken parts in serving size portions
1 tablespoon vegetable oil
6 to 8 cloves garlic, smashed and chopped
1 medium onion halved and cut into thin slices.
Directions:
1. Combine vinegar, soy sauce, bay leaves (break them in half to release flavors), black pepper and sugar in a large bowl. Add chicken, stir to coat with marinade. You can cover this marinade in refrigerated it for 1 to 4 hours, or cook it right away, if you wish.
2. Heat vegetable oil in a large skillet over medium-high heat. Add onions and garlic. Cook until onions are just soft, but not brown, stirring frequently.
3. Add the chicken and all the marinade juice to the pan. Bring to a simmer, cover, and cook until chicken is tender, about 45 minutes. Uncover and cook until sauce has reduced slightly, about 10 minutes. Serve hot with white rice and fresh tomato slices.
Variation:
Some people add a large, chopped potato to the pan while cooking the garlic and onions, then add the chicken and marinade juice over the top to finish cooking.
Wednesday, June 18, 2014
Asian 5 Spice Mix
This spice mix is great for when you are making home made Asian food. Its my favorite go-to blend. Add this to any Asian dish as you cook, and your kitchen will smell like an Asian restaurant! Its easy to make and stores well. I highly recommend buying the "Badia" brand of spices, usually found in the hispanic foods section-- most grocers carry it, and they are 1/2 to 1/4 the price of other spice brands. You can also find some of these in dollar stores.
Asian Spice Mix:
Ingredients:
- 1 tsp. ground Szechwan pepper
- 1 tsp. ground star anise
- 1 tsp. ground ginger
- 1/2 tsp. ground cloves
- 1/2 tsp. ground cinnamon
- 1/2 tsp. salt
- 1/4 tsp. ground white pepper
Place all ingredients into a bowl and blend well. Store in a tightly sealed (labeled) container.
Filipino Lumpia Recipe
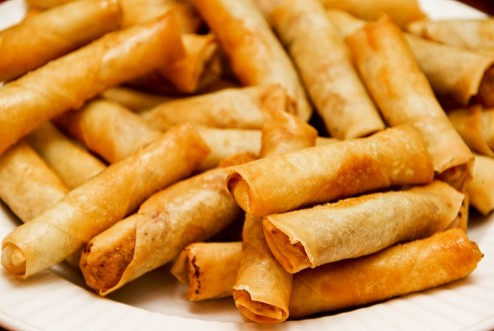
Hot, crispy and delicious! This is a recipe for Filipino Lumpia (Filipino Egg Rolls). My great uncle Carl married a lovely Filipino lady, so I have a few half-Filipino cousins too. His wife and her sister both came to live with our family in the United States. They usually
brought these scrumptious goodies to family events (along with some rice noodle dishes, and some adobo). The lumpia never lasted long though, because they
are soooo addictive! But that is how our
family became so familiar with them.
While I cannot share the family recipe (they run a business selling their Lumpia called "Ilocos Lumpia" and specifically requested that I don't share their recipe)-- I will share my own tweaked recipe here, which is still pretty good! Plus a few useful tips.
I've done my research, too. Most of the basic, traditional Lumpia recipes will contain
at least ground meat, onion, garlic and carrot.
Regardless of the changes people make to the recipe, those are almost
always the base ingredients they start with.
But there are just as many variations of the recipe, as
there are Filipino families! Some of
them much more common than others, of course.
This is a basic recipe, with a few very common extras—but also
a few ideas (which are optional) for anybody looking to jazz-up the mixture to make it different
each time, for variety.
There are 2 ways of cooking Lumpia—by pre-cooking the
meat mixture before stuffing the wraps, or by leaving the meat raw and letting
it cook during frying. The choice is
yours. Both methods work well, and come
out great!
But for my recipe, I’m going to be using the “pre-cook the
meat” method, because that’s how my aunt and cousins do it. Less risk of uncooked meat, and cooks
faster. Freezes better too. This recipe can be doubled, tripled,
etc., for however many people you are feeding.
Filipino Lumpia Recipe
Meat filling:
2 lbs ground
beef, chicken, turkey or pork
1/2 cup
shredded carrot
1/2 cup chopped green beans
¼ cup minced
red or green onion
1.5 tsp salt
2.5 tsp
black pepper
6 cloves
minced garlic
1 packet (1
tsp) powdered / crushed chicken or beef bullion
1/8 cup soy
sauce
1.5
tablespoons sugar
1 tsp Asian
Seasoning (or a mix of equal parts cinnamon, cloves, ginger and white or regular pepper)
1/2 tsp sesame oil
1 pack (16oz.)
spring roll / lumpia wrappers
Other Needed
Items:
2 egg yolks whisked
together and set aside (for sealing the wrappers)
½ cup vegetable or canola oil for frying (or enough to fill
the pan with ½ inch of oil)
OPTIONAL INGREDIENTS-- As promised, here are some other
ingredients you can add for variety (as you can see in the recipe above, I have added carrots and green beans, my favorite!). It’s
recommended you DO NOT add more than 2 of these extra ingredients, otherwise
your mixture will be too “bulky” with not enough meat. But of course if you are a vegetarian, feel
free to splurge! Its best to use ½ cup
of any addition, minced:
Shrimp
Shredded
cabbage
Cilantro
Water
chestnuts
Mushrooms
Celery
Green beans
Bean sprouts
Potato
Bell pepper
Or 1 tsp mushroom
seasoning, or orange zest
Directions:
1. 1. In a large skillet over medium heat, add the
meat and vegetables. When meat begins to
brown, add (one at a time) the salt, pepper, garlic, bullion, soy
sauce, sugar, Asian seasoning, and sesame oil. Blend
well. Cook an additional 5 minutes, stirring frequently so the spices don’t burn and the garlic flavor releases into the mixture.
2. Remove from heat and allow meat mixture to cool until you can easily
handle it.
2. 3. Peel lumpia
wraps apart slowly, don’t tear them. You
can keep them between 2 damp paper towels (rung out very well) to keep them
from getting dry as you work. Cut wraps
in half corner to corner, creating 2 triangles. You can make more lumpia with fewer wrappers this way.
3. 4. Take 2
tablespoons of meat mixture and spread it out horizontally, along the widest
edge of the wrap. Secure the meat by
folding the wrap around it like a skinny tube, tucking in the ends. Roll it up the rest of the way, and secure it
closed at the end, with egg yolk. Set aside, folded side-down. Repeat until all the mixture is gone.
4. 5. Heat the
oil in a large skillet, over medium heat. You want your oil to be hot enough to make the lumpia wrapper golden and
crispy, but not too hot. Basically, the
oil should not be smoking. If it’s too
hot, turn it down. Otherwise, your
lumpia will burn on the outside very quickly.
5. 6. Place as
many Lumpia into the pan as will fit comfortably, leaving about 1/2 inch of
space between the lumpia. Do not crowd
the pan, or they may stick together, or take longer to cook. Turn the lumpia as they begin to brown, so
that all sides of the wrap will become golden. Fry for about 2 to 4 minutes, depending on your pan, until golden. Don't forget to turn them!
6. 7. Remove
lumpia from oil and let drain on a clean kitchen towel, or paper towel. Serve hot with sweet chili sauce.
TIP: You can make
lumpia in bulk ahead of time. Uncooked
lumpia rolls can be frozen for up to 2 months. When it comes time to cook them, simply let them sit out (spread apart) for about 30 minutes, and then
cook as usual.
Tuesday, April 15, 2014
Homemade Graham Crackers
I got this recipe from an employee magazine in the break room at work. I decided to try it, and thought they were delicious! So I figured I would share it here with everyone, since Graham Crackers are a timeless classic.
Homemade Graham Crackers
Ingredients:
2 ½ cups all
purpose flour (plus extra for dusting)
1 tsp baking
soda
½ tsp. salt
1 tsp
cinnamon
1 cup (2
sticks) butter, softened
½ cup dark
brown sugar, packed
3
tablespoons honey (corn syrup will also do)
1 tsp
vanilla extract
In a medium bowl, combine flour, baking soda, salt and cinnamon. Set aside.
In a large bowl, or a stand mixer bowl, cream butter, sugar, honey and vanilla on low speed until fluffy, about 3 minutes. Add flour mixture and blend well.
Transfer dough to plastic wrap, press into a square and refrigerate at least 2 hours, until firm.
Preheat oven to 350 degrees, F. Line two baking sheets with parchment paper,
or wax paper, set aside.
Remove dough from fridge. On a lightly floured surface. Roll out dough into 1/8-inch thickness. Cut out 2 ½ x 5 ½ inch crackers. Roll additional scraps into 1/8-inch thickness and cut out as many additional crackers as you can.
Place crackers on lined baking sheets and use a tooth pick to poke uniformed holes in crackers about ¼ inch apart. Bake 12 minutes, rotating sheets halfway through, until crackers are brown and slightly firm. Let cool on baking sheet for about 3 minutes before moving to a wire rack to cool completely.
Store in an air-tight container at room temperature for up to 5 days.
TIP: Before baking, you can also sprinkle the crackers with a cinnamon-sugar mix.
Wednesday, April 2, 2014
Sole Meunière Recipe ( Fish Fillet With Butter And Lemon )
This is a rich, buttery French sole fish
recipe. But you can also use whatever
fish fillet you have. Its also quite
special, because upon her first visit to France, the world-famous chef Julia Child
had this dish in a French restaurant, and it inspired her to take an interest
in French cooking. In the film “Julie
And Julia” there is actually a shot of this dish being served to Julia, right at
her table!
This recipe is great when you end up with some fish in your
home and aren’t sure how you want to cook it (maybe you have some catch from a
recent fishing trip?). Its quick,
simple, classic and delicious!
This is for ONE fish, but you can double, triple, etc. the recipe as needed.
Ingredients:
14oz. sole
filet (or any fish filet you have)
¼ cup
plain flour
1 egg,
beaten
1/4 cup
bread crumbs
2
tablespoons oil
3 ½ tablespoons
butter
2 tsp
lemon juice
1 tbsp
chopped parsley
Salt and
pepper to taste
Directions:
Season the flour with ½ tsp salt and ten shakes (or
turns0 of pepper). Or to taste. Mix together.
Place the fish in the flour and coat each side with
it. Gently tap to remove any excess
flour.
Heat oil in large skillet over medium-high
heat. Sprinkle pan with a pinch of
flour. If the flour sizzles, the pan is
hot enough.
Add HALF of the butter to the pan and place the fish
in the pan. NOTE: If cooking more than one piece of fish, DO NOT crowd the pan, or else fish will steam, rather than turning brown. 2 fillets maximum in the pan.
Reduce heat to medium. Cook fish on medium heat for 4 to 5 minutes, only moving gently, until golden in color on one side.
While fish cooks, in a separate pan, melt the
remaining butter on medium heat. When butter
starts to turn slightly brown, add the lemon juice and parsley. Remove from heat and place butter-lemon “sauce”
in a small bowl.
Carefully turn the fish over, and cook for an
additional 4 to 5 minutes, until other side is also golden in color.
Remove from pan and place on a serving plate. Pour butter-lemon sauce over fish and
serve.
**TIP: If
you prefer breaded fish, you can simply coat the fish in a beaten egg, then
roll in some bread crumbs before frying, and simply add all the butter, lemon
juice and parsley to the pan while cooking the fish.
Also, a great side to serve this fish with would be
steamed asparagus and halved new potatoes, seasoned and cooked however you like.
Friday, February 21, 2014
Pizza Dough / Pizza Recipe (Homemade)
I recently discovered that many professional pizza places (and Italians) use a ciabatta bread dough for pizza crust! So since I had a great ciabatta bread recipe on hand, I decided to try it. But of course, I did have to make a couple of adjustments to the process for pizza…. And the result was a GREAT pizza crust! Best homemade pizza I had ever made, really. And now I feel like I’m never gonna have to pay the high price of delivery pizza ever again! So I would like to share it with you all—mainly the pizza dough, but I also added some quick instruction on actually making it into a complete pizza. Enjoy!
Pizza Dough
Ingredients:
1 ½ tsp active dry yeast
1 ½ cups warm water (same
temperature for a newborn baby bath)
1 tsp salt
1 tsp sugar
1 tablespoon olive oil
3 ¼ cups bread flour (or regular
flour)
1.
In a small bowl, dissolve the yeast, salt and sugar in
lukewarm water. Add oil and blend well.
2.
Gradually mix in flour, adding flour one cup at a
time. Don’t add too much flour, but just
enough to make the dough “kneadable” but still soft.
3.
Knead dough about 1 minute, using a light dusting of flour, if
needed.
3.
Lightly coat a clean bowl with cooing oil, and place
dough in the bowl, turning it over to coat in the oil. Cover and let rise in a warm place, 1 hour.
4.
Punch dough down and lightly dust with flour. Knead 30 seconds. Place dough on your pizza ban and form into
a pizza dough of your desired shape. Rub
olive oil around the edges of the crust.
To Make Into A Pizza:
1.
Preheat oven to
450 degrees F.
2.
Top pizza crust with your favorite pizza sauce (usually
¼ to ½ cup, most jarred or canned spaghetti sauces work perfectly), your favorite shredded/grated cheeses (2 to 3
cups, depending how much you like)-- and toppings, such as meat or sliced
vegetables (meat should be pre-cooked).
3.
Bake on center rack at 450 for 15 minutes, or until cheese is bubbly
and crust is slightly golden. Remove
from oven. Let stand 3 minutes. Cut into slices and serve.
Subscribe to:
Posts (Atom)