Tuesday, August 18, 2015

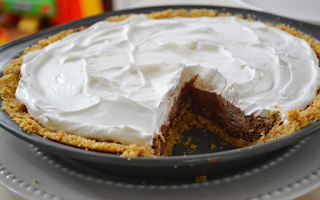
Chocolate Cream Pie


“You know what I love about cooking?  I love that after a day where nothing is certain-- and when I say noting, I mean nothing—you can come home and absolutely know that if you add egg yolks to chocolate and sugar and milk, it will get thick. Its such a comfort.”
 Quote from the movie “Julie and Julia”, during a scene in which Julie Powell is making a chocolate cream pie after a rough day at work.    

Chocolate Cream Pie
(The original recipe calls for a chocolate wafer crust, but I changed it to include a graham cracker crust, like the one in the above-mentioned movie)

Ingredients:


Graham Cracker Crust:
1 2/3 cups graham cracker crumbs
6 tablespoons (3/4 stick) butter melted
1/4 cup sugar

Pie Filling:
1 cup sugar
½ cup flour
3 cups whole milk
3 oz semi-sweet or dark chocolate, chopped
4 egg yolks
1 tbs unsalted butter
1 ½ tsp vanilla extract
2 to 3 cups whipped cream (sweetened to taste if homemade)

Serves 8 - 10
Set oven to 350°F.

Directions:

Pre-Make The Crust:

In a medium-sized bowl, mix together the graham cracker crumbs, melted butter and sugar until all the crumbs are moist.  Mixture should be crumbly.   Transfer mixture into an 9-inch pie pan and press the mixture evenly to the bottom and up the sides of the pan.  Bake crust 7 to 8 minutes.  Remove from oven and allow to cool. 

Filling:
1. In a 3 quart sauce pan, combine the flour, sugar, and milk. Whisk together. Add chopped chocolate. Over medium-high heat, whisk the mixture until chocolate melts and mixture gets thick and bubbly (between 5 and 10 minutes). Remove from heat. 

2. Using a ladle or large serving spoon, slowly drizzle about ½ cup of the mixture into the egg yolks, whisking constantly as you go, to temper he eggs and avoid scrambling them. 

3. Add the yolks and chocolate slowly to the saucepan, whisking constantly. Blend well. Return saucepan to heat and allow it to bubble up and simmer for about 2 minutes, or until nice and thick. It should be about the consistency of a smooth, pourable cake batter.  

4. Remove saucepan from heat and stir in butter and vanilla extract. Pass mixture through a strainer into a bowl, to ensure it is smooth with no clumps. 

5. Pour into pie shell, scraping the bowl well with a rubber spatula. Cover with plastic wrap, allowing the plastic to touch the surface of the chocolate, to prevent a “skin” from forming. Chill in the refrigerator overnight.
Whipped Cream Topping:

1 cup heavy cream
3 tablespoons sugar
1 teaspoon vanilla extract

In an electric mixer with a whisk attachment (or using a bowl with an electric hand mixer) whip together the cream, sugar and vanilla on a medium-high speed, until peaks begin to form.  Spread topping evenly over pie, or pipe it on to create a design. You can also garnish the pie with chocolate shavings, loose graham cracker crumbs, or chopped nuts.
Dad's Chicken-Fried Pork Chops


Our family would have pork chops probably once a week, or at least once every 2 weeks.   We always used pork SHOULDER chops.  They had better flavor because of their good fat marbling. They tended to come out more scrumptious—crispy fat, and tasty meat.  Other cuts would often be too thick or too dry and tough, because the center of the meat was so un-marbled and dense. The ones we selected were often oblong, and we would cut them in half either before or after cooking. We almost never used any other cut. 

Dad's Chicken-Fried Pork Chops

Ingredients:
2 to 4 pork shoulder chops, about ½ inch thick
2/3 cup flour
1/3 cup corn starch
Salt and pepper to taste
Enough cooking oil to cover the bottom of a large skillet

Directions:
1.        Heat a heavy bottom skillet between medium and medium-high heat (cast iron is best).  Cover bottom of pan with oil.  
2.       Place the flour and corn starch in a container large enough to hold a pork chop.   Blend the 2 dry ingredients together thoroughly.   Corn starch helps to create layers and a more crispy crust.   
3.       Roll the raw pork chops in the flour/corn starch mixture, until well coated.  Set aside on a plate or other safe surface to rest.  This will let the flour stick to the meat better.  
4.       Place flour-coated chops in the hot skillet and allow to cook for 5 to 7 minutes.   Do not move or lift the chops during this time.   Some people believe it will prevent sticking, but this is not true.  Moving the chops too soon will cause the soft flour to peel away from the meat and stick to the pan.   You should allow the flour to turn into a crispy skin before you move the meat.  
5.       When edges of the chops are golden-brown, flip them over.  Cook an additional 5 to 7 minutes.  If additional cooking time is needed for a slightly different cut of chop (thicker, etc.), please do so.  Look for signs that the meat is done—both sides should be golden brown and NO pink or red juices (or under-cooked blood which looks thick and white/pale grey) should be seeping from the meat.  Center of meat should be firm.  Bottom should be golden brown.  
6.       When chops are done, remove from the pan and transfer to a paper towel to drain.   Serve with your favorite sides like:

Mashed Potatoes:
http://melissavalentineskitchen.blogspot.com/2014/01/creamy-mashed-potatoes-my-familys-way.html 
 
Milk Gravy: 
http://melissavalentineskitchen.blogspot.com/2013/12/dads-milk-gravy-recipe.html